Wednesday, 1 October 2014

Operation winter coat is go!

I may not have been blogging too much due to work and general life busy-ness, but I have been sewing and planning quite a bit!

The big project I am working on is a winter coat.

I was looking for a fairly simple shape with a collar and some waist shaping and I picked up this great 1960s pattern on Etsy:


It has lovely princess seams running to the waist with welt pockets at the bottom, bound buttonholes and is fully lined.

I knew I was going to have to buy fabric online for it as my local fabric shop just doesn't stock great quality coating. The fabric I used for my Anise really hasn't held up well which is frustrating when you think of all the work that goes into a coat (especially one with welt pockets and bound buttonholes!). After much perusing of online fabric shops (it's a dirty job...) I ordered a stack of swatches from Stone Fabrics. They have a great selection of coatings and I have read good things about their quality. You have to call up and order but they were very helpful and got my order out really quickly - they're not paying me to recommend them BTW, I just like to give praise where it's due!

I ordered this wool mix coating (90% wool but not scratchy - 100% wool rarely works on my skin). A good tip I found was to keep rubbing the swatches together over a few days to see how they might hold up to wear. I actually rejected my original choice after it went a bit fluffy when I did this so hopefully I have chosen one that will wear well!


The lining is also from Stone Fabrics and it's viscose acetate in a beautiful peacock blue - the picture really does not do the colour justice.

As ever, I asked for advice on twitter for interfacing and the ever helpful Anne from Mercury Handmade recommended Speed Tailoring from Gill Arnold as she uses it in all her coats. This stuff is ideal for stabilising an open weave and is beautifully soft.

For buttons, I bought huge 1960s style ones from John  Lewis. I hope they don't look stupidly big on as I'll have to do the bound buttonholes first!

I think you'll be getting quite a lot of in progress posts on this as coats take such a long time. Wish me luck!


Monday, 22 September 2014

The long awaited Moneta


I sewed this forever ago, but as you have probably noticed, finding time to blog things recently has been difficult!

I made this Moneta from Colette Patterns for our holiday to Sicily back in August, and it's great to look back on the beautiful scenery and lovely weather!  The pictures are on the island of Stromboli (an active volcano) where we went on a boat trip.

There seemed to be a lot of relatively similar knit dress patterns released by the indies this summer, and although I probably could have hacked this myself, I decided to go the convenience route.  I also love this neckline - it's perfect for me, and the downloadable collar options sealed the deal!  Annoyingly I don't have a pic of the cute crossover collar at the back so you'll need to imagine.


It's a simple knit bodice with no darts and a gathered skirt.  I lengthened both the bodice and skirt by 2" based on measuring the pattern pieces - this is a standard adjustment for me,  The only fitting issue I had was some gaping under the arms.  To get rid of it, I pinched it out at the side seam - it's not perfect but it worked OK.

I'm not sure about the gathering method used on the skirt - it calls for clear elastic to be stretched and sewn to the skirt which gathered it up when the stretch is released.  It really wasn't that easy to do.  I'll probably give it another go on another version I have planned, but I suspect that other gathering methods may be just as easy.

This pattern is a total fabric hog for such a simple knit dress!  I had bought 2.5 metres of this cotton jersey from Goldhawk Road without checking the fabric requirements, but as it's a self lined bodice, the pattern calls for close to 3 yards.  With my length adjustments, I wouldn't have had enough to line, so I overlocked the armhole edges and turned inside.  I finished with a double needle.


An arty shot from my husband - he loved that the writing on the wall matched the dress!
I love this dress - the fabric is quite weighty and the skirt swishes really nicely,.  It's quick and easy to make, and I have a winter version in the works now that the weather is getting colder.  I had plans for a striped version too but didn't manage to find the right fabric.  Maybe for next summer!


Minerva Blogger Network - the Staple Skirt


I've been thinking a lot about what items I need to make for winter to fill some wardrobe gaps and I realised I really needed a dark denim skirt.

 I ordered this dark denim from Minerva with the intention of making (another) Kelly skirt, but I spotted the Blue Ginger Doll Peggy skirt pattern in my stash (which I won from the lovely Roobeedoo in a giveaway). The denim is quite weighty so it definitely good for something that needs a bit of structure.

 I decided to make view A with a straight waistband and tabs, as I had ordered some silver jeans buttons as part of my kit.

I must admit this was not the most straightforward project I have ever made. The pattern was pretty hard to trace as the lines for each size were the same (although this has apparently been changed due to feedback so if you like the pattern, don’t let that stop you ordering it!). The fitting was very easy – it’s an a-line skirt, so using my waist measurement worked perfectly. I shaved a tiny amount out of the hips once it was completed but that was all. It’s really long – 27” from waist to hem, so I didn't even need to lengthen it!

 The rest of the problems I had were machine related. I struggled to get my topstitching looking neat. I used topstitching thread in a pale grey (also included in the kit) with a topstitching needle, and played with the tension a lot on the advice of the ever helpful twitter and instagrammers. The inside doesn’t look pretty but I decided to call it good and move on – from the outside it looks fine.

'Scuse creases - I had just got out of the car after a morning of rushing around!

 For the lapped zip, I used a silver metal zip from John Lewis as I didn't have one in my stash and wanted to match with the buttons and topstitching.

 My machine did not want to play ball when it came to making buttonholes. It took many many tries to produce the 5 I needed for the tabs and waistband. But I got there in the end. In contrast, the jeans buttons were really easy to attach – I used the tool provided in the pack, made a hole in the fabric with an awl (a slim skewer would work just as well) and bashed it a few times with a hammer.


It wasn't the easiest project but I am happy with the end result – I know I’ll wear it a lot all year round, with flats in the summer and tights and boots in winter.

 If you want to make your own Peggy (or the kit would work for a Kelly too) you can buy a kit which includes 2m of dark denim, a pack of 8 silver jeans buttons and a spool of pale grey topstitching thread from Minerva here:

 http://www.minervacrafts.com/es018denim-60-wide-100-cotton-7.5oz-denim-dress-fabric-black-or-indigo-blue.html
 http://www.minervacrafts.com/622251-prym-non-sew-jeans-buttons-silver-matt-laurel-wreath-17mm-8-pieces.html
 http://www.minervacrafts.com/2t308-gutermann-(sewing-thread)-top-stitch-30m-8.html

Wednesday, 20 August 2014

Minerva Blogger Network - The Polkadot Frock


I love polkadots but realised recently I have hardly any polkadot items that are in regular rotation!  When I saw this lovely navy polkadot stretch cotton on the Minerva site, I decided to rectify the situation.

The fabric is a really lovely weight – not too stiff but not especially drapey.  It’s not as smooth as sateen but has a lovely feel to it.  Of course, the stretch makes it really easy to get a good fit and it’s lovely to sew with.


I’ve been meaning to make another Anna dress for ages – no idea why I haven’t got around to it before now!  Probably just distracted by newer, shinier patterns!  The boat neck is my favourite neckline and I love the fit of the bodice and the kimono sleeves.  It’s also super quick to sew with no sleeves to set in..  I wanted to change up the skirt, and while on holiday, I realised that the full skirt from my Mad Men vintage dress pattern is pretty much my perfect skirt style so I used that.

I had already fitted the Anna bodice, lengthening by 2”, doing a ½” FBA and adding a couple of inches to the waist.  I measured the waist, subtracted the seam allowances and adjusted the skirt pattern to ensure that it was the same size so that the side seams would match up.  In a fit of paranoia, I added an extra 2” at the waist which I later ended up removing.

I had added the pockets from the Emery pattern as I really like the way they are joined into the waist seam and so don’t flap around like some side seam pockets can do.  Unfortunately when I had to take out the extra at the waist, I had to remove the pockets to make the skirt sit correctly over the hips.  But I’ll definitely use them against next time.


I must remember next time that the skirt on this pattern Is really long – I took 5” in length off, leaving  2.5” hem and I’m 5’9”.

All the seams are finished with overlocking.

I had planned to do a blind hem by machine.  I spent some time working out how to do it and then decided to sew in by hand using a catch stitch.  The end result is lovely but this is a seriously long hem to sew by hand!

I’m really happy with this dress – I can wear it now with bare legs and later in the year with tights and boots so it’s going to be really useful.

If you want to make a dress like this, the kit from Minerva includes 3m of polkadot stretch cotton and an invisible zip (links to the individual items rather than the kit link while the new website is under construction):


Saturday, 19 July 2014

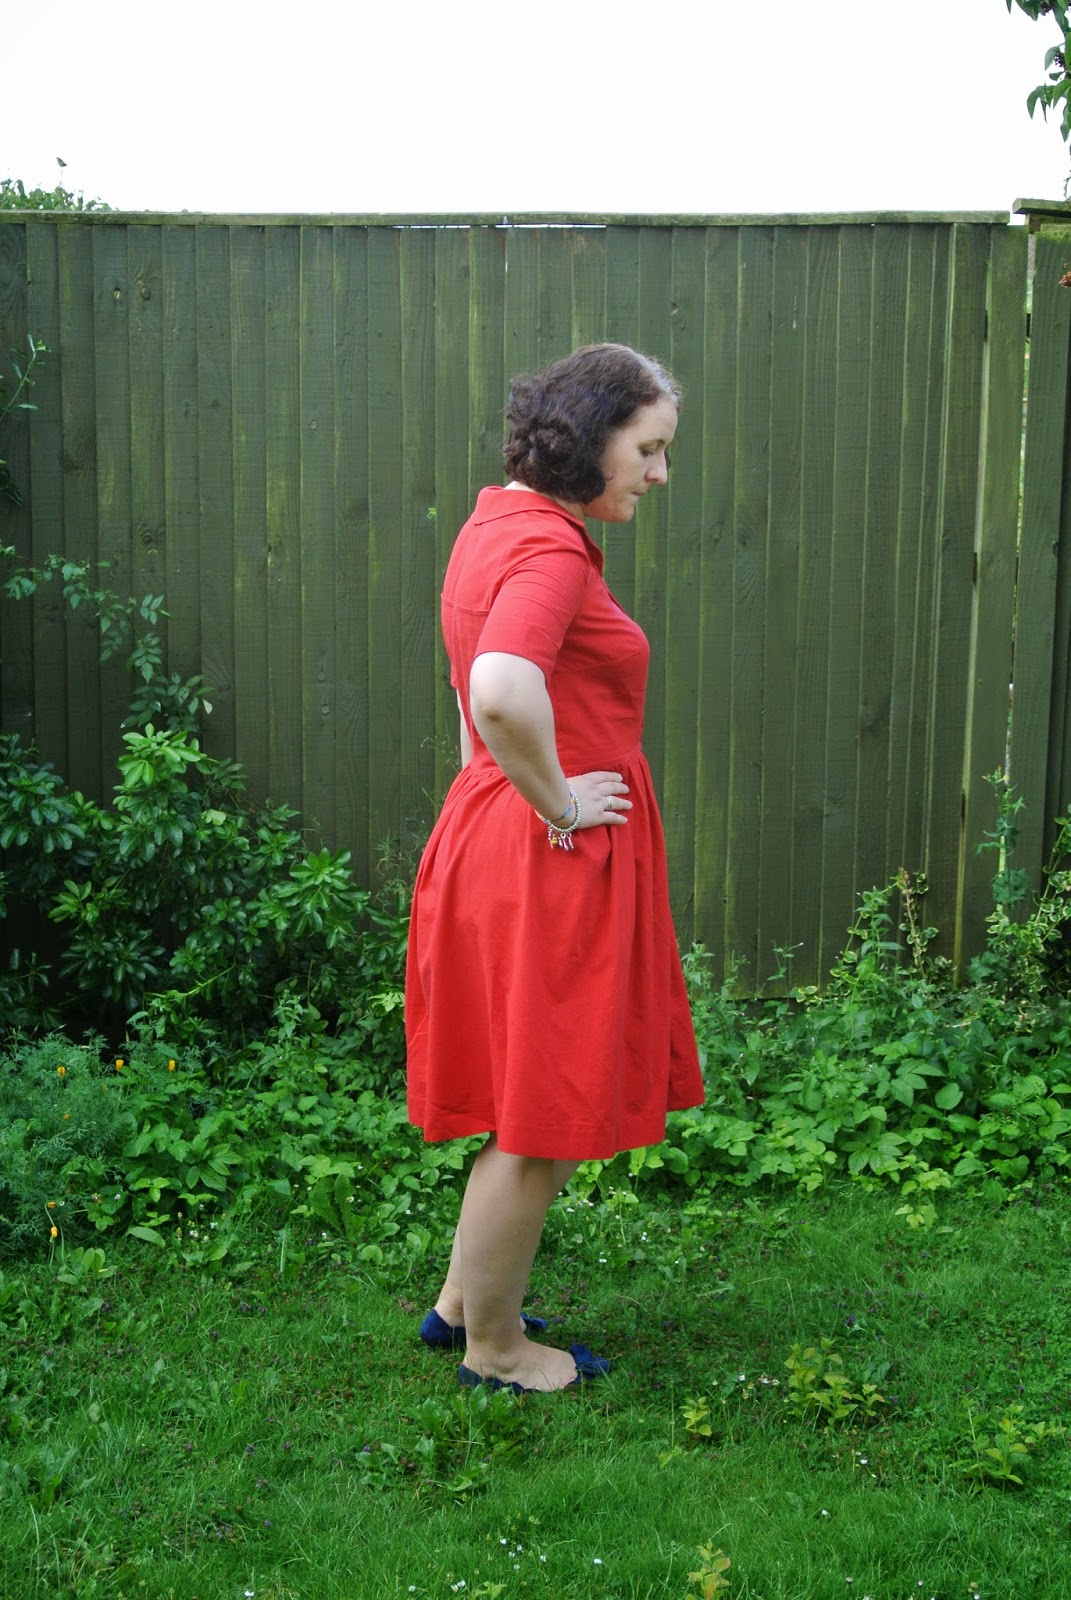
Minerva Blogger Network - Vintage shirt dress

Hot on the heels of finally posting my reveal of my party dress, it's time for my July make.

Cat photobomb!
I've had this vintage pattern in my stash for about 6 months and just fell in love with the notched yoke and cute collar so it wasn't going to languish unused for long!

I ordered some linen look cotton that Kathryn used for this dress, and it's really lovely.  It's lightweight but with a lovely textured linen finish (and it doesn't crease as much as linen does either!).  I wore this on a pretty hot day and it was lovely and cool.  For the £4.99 a metre price tag it's great and comes in a huge range of colours.  I went for red, and it's just the colour of red I like - not too orangey.


As I was running out of time on this make, I tissue fitted the tracing and found that my usual adjustments were fine, so I did a small FBA and lengthened the bodice by 2".


Although there are a huge number of pattern pieces for the bodice - the front and back both have bodices, yokes, bodice facings and neck facings, this came together really quickly and easily.  The construction method to get the lovely notches involved attaching a bodice facing piece to the bodice piece which is turned and pressed and then topstitched to the yoke piece.  I couldn't quite understand it reading the instructions until I actually tried and it was pretty easy and gave a great finish.


I decided not to use the pleated skirt pieces that came with the pattern as the bottom hem would have measured 83" which seemed crazy!  The skirt pattern had 3 pieces - 2 side pieces and a back piece.  I went for a simpler gathered rectangle using the Emery pattern pieces as a guide to size and length, and positioned the seams at centre front and centre back to allow for the front opening.  I used the same method of finishing the skirt edges as the patterns uses - the top edges under the notches (which I transferred from the vintage pattern pieces) are finished using bias tape and turned under, and then the gap is left open.  I stitched on a couple of hooks and eyes in the hope of holding this closed but as this hasn't been all that successful, I think I will add another couple of buttons on to avoid knicker flashing (and contrast bias tape flashing - this cherry print bias is adorable but I probably would go for matching stuff with hindsight!).


The pattern calls for covered buttons, which I ordered as part of my kit from Minerva.  However I had a total fail with these!  The teeth didn't seem to want to grab the little circle of fabric and when I finally got it all tucked in, the back wouldn't stay on - anyone got any tips on how to use these?  I went with some buttons from the stash instead.  The front of these buttons felt a bit fancy for the style, so I flipped them over and used the other side.

The only other change I made was to move the button placement a bit as it was more flattering to have them starting lower down.

I'm really happy with this dress - it's lovely and cool and easy to wear, and it feels like a vintage dress on.  Perfect for the warm weather we've been having (long may it continue!).  And this is item number 2 for my Vintage Pledge!


Minerva are working on their website currently so rather than one link to my kit, here are the links to the individual components of it if you want to make a similar dress for yourself!


Friday, 18 July 2014

Reveal - the Disco Apocalypse dress


Somewhat belatedly, here's my Minerva Crafts make for June (I thought I had already posted this, so it's even later than expected!)


As you might remember we had to make a party dress to celebrate Minerva's win at the British Sewing Awards and to wear to the meet up at the Crafts Centre. Due to unforeseen circumstances I couldn't make the meet up and  a bit late in photographing and blogging my final dress!

As per my preview post, I used pewter sequinned lace to fulfil my hankering after a lace dress, and lined it with navy lining to make the lace pattern really stand out.  This worked well and I much preferred it to matching or nude lining.

I had initially planned to make a straight By Hand London Flora with the wrap bodice but when the lace arrived I realised it had a scalloped edge which I wanted to show off. So I looked for a pattern with a full skirt that was cut straight across the hem and settled on Gather Mortmain. I love how the pleats look on the skirt!

I underlined the bodice with the navy lining and basted them together.  I also marked the darts with basting stitches so that the two layers didn't separate and make the darts wonky. I also spent a lot of time unpicking sequins from the seam lines.  I'm not sure whether this was totally necessary or whether I could have sewn over them. But this gave rise to the name of the dress - by the time I had cut the lace and unpicked sequins my house was covered in glitter and it really did look like the Disco Apocalypse had arrived! We are still finding sequins now!

I also lined the bodice as per the pattern instructions. Due to the contrast, understitching was really needed with this dress to stop the lining peeking out.

I decided not to line and underline the skirt as I had intended, and just went for underlining.  I cut my pattern pieces in lining and hemmed them by machine. I then lined them up with the point on the fabric where I wanted the hem to fall so that I could have the scallops extending out at the bottom. I used french seams to finish the side seams.


I sewed it with my walking foot throughout and I was really happy with the results as it definitely stopped the layers from shifting! The only issue was on the side seams of the skirt where it doesn't sit perfectly - you can see this in the side view above. I suspect this is to do with attaching the lining to the skirt as underlining and the heavy lace wanting to pull down more than the lighter lining. Anyone able to shed more light on this?

The bodice is a bit wrinkly but again I think this it mainly due to the lace pulling down slightly more than the lining. I could probably have fixed it by taking out a lot of the ease but I wanted a slightly looser fit for eating and dancing!

The zip does actually do up all the way. Damn.
The name is based on the state of my living room floor after cutting this fabric - it looked like a glitter ball had exploded!  We are still finding sequins now (yes, I do clean - sometimes!).

Sorry I missed the party Vicki and all at Minerva - I hear it was a good one!

Monday, 7 July 2014

Spring Sewing Swap


I was so excited to participate in the Spring Sewing Swap this year organised by the lovely Kerry from Kestrel Makes.  It's one of the things I really loved when I first got into the world of sewing blogs.

I was paired up with Emma Jayne from Clipped Curves.  if you don't already follow her blog, you should as she makes excellently fitted garments (check her sailor trousers!) with a nautical flair.  Basically I want to be her when I grow up!

She also lives quite close to me so we are hoping for a meet up for coffee and sewing chat some time soon!

Here's the lovely bundle she sent me:


Navy twill
a lightweight bird print cotton
navy twill tape
cute stripy buttons

plus this excellent vintage A-line skirt/ culottes pattern (with pockets!  I love pockets!)

Hop over to Emma Jayne's blog to see what was in the parcel I sent her (being much more organised than me, she has already blogged about it here!).

Thanks for organising Kerry - roll on next year!