Tuesday 20 November 2012

Finished - Alma Blouse


This was my first Sewaholic pattern and I have say, I really love it!  I'm pretty late to the Alma party and have been seeing lovely versions popping up all over the blogosphere - in particular Karen's and Jane's.

For this version I totally stalked Marie's lovely peter pan collar version - I really liked the way she used the print for the body with a plain collar as it really makes the collar stand out.

I picked up the fabric for the body in the John Lewis sale - It's a cute cotton floral print.  The lady behind me in the queue nabbed the rest to make a shirt dress for her daughter and I think it would make a great
shirt dress!  The blue cotton for the collar was a remnant from my stash.


The instructions are really clear (thanks Tasia!) and the fit was great straight out of the envelope (apart from my usual length adjustments which are easy enough by now).  The only thing I am less keen on is the slightly odd sleeve length - I am still toying with shortening them after seeing Jane's version.

I do love how versatile this pattern is - I have a sheer chiffony print to make the long sleeved version, I think with the scoop neck and I am toying with a cap sleeved version from a beautiful cotton silk remnant I recently bought (but I think that may need underlining so I am nervous!).

I've worn it loads already so I am calling it a definite win!

Friday 16 November 2012

The Brave Peony

So I definitely have to work on hubby's photo-taking-for-sewing-blog skills.  In the approx. 2 minutes he will spend taking pics before work (resulting in about 10 pics and 1 usable one) the clothes always look awful!  This dress does actually look better on and fits better than these pictures would suggest!

Anyway here is the Brave Peony.  So-called because my daughter thinks it makes me look like Merida rather than because there is actually any real bravery going on (invisible zip insertion does not count).


It is made from teal suiting, which I largely chose because I liked the colour rather than the actual fabric.  I think this was possibly a mistake.

As I had made a wearable muslin already, I knew what adjustments I wanted to make.  I had already done a lot of lengthening -2.5" to the bodice and 3" to the skirt, and added a bit to the skirt waist too. 

I did a wide shoulder adjustment which I learned in my Anise Jacket works well for me.  However I do think I need to do some changes to the armscye as a result, but I'm not sure what.  You can see it pulls slightly at the armhole seam, although the shoulder is in the right place.  Can anyone advise on this?

I also moved the waist darts out about 1" as per Lladybird's post during the Sewalong.  Although the finished dress doesn't actually look as nipple-y as these pics suggest (but it was pretty cold out that day!), I think I messed up when trying to reshape the darts for a better fit under the bust as per Gertie's post and needed to shorten them a bit more.  After having resewn them a couple of times I decided to quit while ahead!  Anyway, I think this is a classic example of overfitting on my part - the original pattern would probably have been fine!  But I often feel that I have extra fabric under the bust with Colette patterns, perhaps as they are drafted for a C-cup and I'm a B.  I do love Sarai's designs though so I will probably persist in trying to get the bust darts right for me!

I also lowered the neckline 1" after reading Rochelle's post as I do feel the neckline is a bit choking on this pattern.


I will probably make another one now I have got closer to the right fit (damn you, waist darts!) but I think I prefer the short sleeved version - the long sleeved is a bit "classic" for me (although I did get lots of compliments on this dress when I wore it for the first time!).  Maybe a sleeveless one for the summer as I do love it in a cotton print!  And with the leftover fabric (I thought I had bought the right amount but I always seem to have loads left over when I make a Colette pattern, even with the extra length I have to add) the small person wants a Brave dress for herself!

Wednesday 14 November 2012

Finished - Anise Jacket

 
I actually finished this weeks ago but visiting relatives/ school holidays/ dark evening and rushed mornings have conspired against getting photos of it until now!
 
It was a lot of work, but totally worth it as I learnt such a lot - bound buttonholes, welt pockets, lining a jacket, loads of handsewing.
 
I absolutely love the colour - it cheers me up every day!  (Not that you'd know it from my face in this pic - WTF is that all about?).  As with all Colette patterns, the instructions are really clear and the jacket went together just as instructed.  I bought the Anise Companion too, most of which was used in the online details in the sewalong, and it was great to have such clear pictures in front of me to study as I was working on it.
 
 
The fit is great - it's really comfortable with no pulling or tightness thanks to the wide shoulder adjustment.  The collar is the perfect size and shape and sits really well.  I do wish I had underlined the arms though, maybe with a lighter interfacing or calico (now that I have found out this is what Amercians and pattern instructions mean by muslin, rather than the thin open weave stuff we call muslin in the UK!) as I think the fabric is pretty soft and wrinkles a bit too much.  But It's a minor niggle.  (See, I am totally not mentioning the one wonky buttonhole and the fact that the inside of one of the welt pockets is on backwards).  I am really happy witht he buttons as I agonosied over them for ages before picking these silvery ones from John Lewis.


And another pic just for the terrible faces I was pulling this morning.  I hate weird face days...

I will leave you with the comment received from my sister-in-law - "it's definitely as good as you would get in Primark" (for the benefit of non-UK readers, Primark is a cheap as chips clothing shop where jackets probably cost a maximum of £40).  I think I'll give up now.  Funny thing is, I think she meant it as a compliment!

Friday 19 October 2012

WIP: Anise body finished

Really pleased with how the Anise is coming along.

I have finshed the body and it's starting to look like a jacket!  The sides are pinned for now as I've added a bit more to the side seams over the hips to try and get rid of the pooling at the back.  Have a feeling I should have done a swayback adjustment, but too late now!

Look at the fraying seams!  The inside looks like a plate of spaghetti!

Back view (oops - I think those darts need a bit more pressing!)


I'm really happy with the curved back seams - I basted with silk thread as instructed and it's given a great finish, so I think I'll be doing more hand basting in future.  I used to find it slow and frustrating but I've really seen on this project why it is necessary.


It has 8 bound buttonholes (one is slightly wonky and of course is not one of the mock ones that will be partly covered by a button).

I'm really pleased with the welt pockets!  One may actually be on backwards but you can only tell on the inside!

Thursday 18 October 2012

WIP: Anise fabric and buttonholes

I'm making progress!

I realised in my last post that I hadn't posted about the fabric choices for this.

I'm using a suiting (I think it's a poly but i didn't want a thick wool jacket as I still have last year's coat).  It is a mess of fraying though - just as well the seams will be covered by a lining as I don't know what seam finish would cover up the fraying!  Still a good learning for the future.

It's in my colour of the season, which is teal.  You'll be seeing a lot of sewing in this colour over the next few months as it's a definite favourite!


The lining is a grey satin.  I wish i had gone for my original choice of fuschia pink,  but i was talked out of it by hubby!  Still, the grey will look good.

Buttons are heavy silvery ones with a sort of worn finish.

Rather than lining with muslin as per the pattern, I am using sew-in interfacing.  The muslin I could get was very lightweight and floppy and I didn't think it would give enough structure to the suiting.

I also made some practice bound buttonholes - this is the first step in the pattern (rather than machine buttonholes which are done at the end).  For a first try, they don't look too bad!

Friday 12 October 2012

WIP: Anise Jacket muslin fitting

The current project I am working on is Colette's Anise jacket.  I really love this pattern - it's so Emma Pilsbury (or that could just be the model they used!).  I have a much loved and worn but now looking a bit the worse for wear 1960s style swing jacket and thought this could be a great replacement.

I'm doing the sewalong on the Colette website and also have the Anise Companion instruction book, which is a godsend!  As I would expect from Sarai, the instructions are so clear with loads of great pictures.

Like a good sewist, I started with a muslin.  In actual muslin for once, which proved to be a nightmare!  All that I could get was very fine stuff and I kept losing my notches in the fraying edges.  I traced a size 8 (my usual Colette size) and added 2" in length based on tissue fitting the pattern.  I think you can see from the pics below that it's quite a long way from right!


Pulling under the arms...


Sleeves too short and tight...


Too tight across the back and either needing a swayback or large bottom adjustment.  It's also a bit short still.

Pattern changes made:
extra 1" in length of bodice (is it still called a bodice on a jacket?  The body part anyway!)
wide shoulder adjustment - I guessed at adding about 3/4" to each side
Widened the upper sleeve (according to Fit for Real People you shouldn't alter the lower sleeve!)
extra 2.5" length to the sleeve

I was debating scrapping the 8 and cutting out a 10 as I was worried that it was just too small, but thought for the effort of retracing the new size, I would have another go at the 8!

I think this was the right choice as it looks much better now.
Shoulders in the right place and less stretched across the bust...
'Scuse the weird face - sleeves more comfortable
Back less pulled - that looks like a wrinkle but it's not there all the time, just in this pic!  I didn't do a swayback adjustment, but i have added an extra 1/4" to the side seams so I will pinfit the side seams and see if a bit more room in the hip area will fix it.

Due to the length adjustments, I have also repositioned the buttons and welt pocket by putting the top ones according to the pattern, and the bottom ones where they should have been in relation to the hem, and then spacing the other 2 out.

It's definitely the hardest project I have worked on (by a long way!) but I am learning loads of new things (including bound buttonholes - eek!).  I think the wide shoulder adjustment might become a regular one for me as I can see my Peony wearable muslin could benefit from it too.

Wednesday 10 October 2012

Finished: Peony Wearable Muslin

I actually finished this a couple of weeks ago but I am struggling (even more than usual) to get pictures for the blog when it's getting so dark in the evenings.  This morning I had to drag hubby out of bed early to take these pictures (that went down well!).  Such is the seasonal curse of the UK.


I really like this dress!  I love a boat neckline and the shape of the skirt works well on me.  I wish I had finished it earlier so I could wear it in the summer as it was always intended to be a summer dress, but got bumped down my sewing queue by the Macaron sewalong.    I have been wearing it with tights and boots as pictured but cotton + tights = riding up.  I may actually go back and line the skirt so I can wear it over winter.  It looks very cute with my red cardigan!


I made quite a few changes to the pattern.  As usual, I added quite a bit to the length - 2.5" to the bodice and 3" to the skirt.  I played about with the waist dart length when I lengthened the bodice but I think they have ended up about 1" too long, so I will be shortening them for the final version.  After I had so many issues with the waist fit of the Macaron, I decided to add about 1/2" to each side seam at the waist just in case.  I was glad to see that Rachel at House of Pinheiro does this too!  I didn't need as much ease as this but it was good to have it.

I added piping at the waist as I wasn't sure about the belt - i wanted something to break up the dress though.  And I do love piping!  Learning from my Macaron problems, I swapped out the invisible zip for a normal zip, as I don't think invisible ones work well with piping - to have the fabric sewn that close to the teeth of the zip combined with having to get over the extra piping fabric (even though I trimmed the cord inside short) doesn't work well!  And the piping looks fab on this dress - I managed to sew closer to the cord this time and i think the "tighter" finish looks better).


I finished all inside seams with a clean finish and bound the waist seam with red bias binding from the piping.  I did the same finish on the armscye (ooh, i just used the word armscye - I must be getting  better at this sewing lark!) as on the Macaron - I graded the seam (with the shorter side against the sleeve) and folded the longer seam allowance over the shorter and stiched.  Not sure if this is an orthodox way of finishing but it looks OK and I haven't found an easier way on such curved seams.  Anyone got any suggestions?


For the next version, I will be making a few more changes.  I will shorten the waist darts as above to stop the "nipple-y" look.  I think I need a wide shoulder adjustment.  I just discovered this while working on my Anise jacket muslin and it made a big difference to the tightness under the arms I often have.  Also by looking at it, you can see the shoulders could be wider.  I think the sleeves will be a bit looser once I sort this out.

The final version will be in a teal suiting and I am going to do the long sleeved version.  I might do the belt in a fuschia but I haven't decided yet!  Got to finish my Anise first (more on that shortly)!

Tuesday 25 September 2012

Tiramisu is finally available!

Unfortunately not the yummy Italian pudding on my current diet, but the lovely first offering from StephC's new pattern company Cake.


I love the design of Tiramisu and Steph has lots of hacks planned for us which you can read about here, including getting the perfect fit by drawing in your own side seams!

Best of all, it's on pre-sale on Etsy just now, limited run of 150 copies, and even with shipping from Australia, the total cost is just over £10.  Grab it before it's gone!

Monday 24 September 2012

Twenties Love

Much as I love vintage fashion, I've never been a huge fan of the 1920s.  Perhaps as all those drop waists and skinny hip/ flat chested looks would not suit my shape in the slightest.

But that was until I saw the new John Lewis TV ad:


I just love so many of the clothes she wears.  I'm a real hat person and those gorgeous cloches are amazing!  Especially the red one.  Her hair is so cute (maybe that I could manage!).


The striped dress at the beginning is lovely and she wears several lovely coats.  Love the collar detail on this red one:


But the piece de resistance is this beautiful white dress.  Wouldn't it be amazing as a wedding dress?  And that headband?

Thursday 20 September 2012

WIP: Peony Toile

I've just started work on my Peony which is the next garment in the Sew Colette 2.0 sewalong.  I've had the pattern a while and I really love the simple shape and the boat neckline, which I tried to incorporate into the Disaster Dress (probably enough said about that!).

I bought a navy spot cotton a while back to make it, and am planning contrast red piping at the waist.  After recent zip/ piping difficulties, I am going to use a normal zip!


As this was meant to be a summer project I was planning the short sleeved version - i'm still going to make this and make it a wearable muslin for the longer sleeved winter version I'm got in my head.

First step - bodice muslin!  I made a lot of changes to the basic pattern before I started - i lengthened the bodice by 3", lowered the bust darts by 1", and because the lengthening seemed to make the waist darts too long, I shortened them by 2".


I've pinned up the shoulders as Marjorie isn't as long in that area as me!  It needs a bit more ease in the waist so I have added 1/2" to either side of the centre back.  It's very poofy under the bust (although more so on Marjorie then me!) so I have increased the length of the waist darts by 1" again and hopefully that will fix the problem.  I've also done a square shoulder adjustment of about 1/4" to eliminate drag lines above the bust.  Skirt will be lengthened by 2" to hit just above the knee.

So I'm ready to cut the fashion fabric and will pin fit these adjustments before I start sewing.

Wednesday 19 September 2012

Finished: Milkmaid skirt - another backlog garment!

As soon as I saw the Milkmaid Skirt for Grown Up Girls on Crafterhours, I really liked it.  I totally wanted to stalk Adrianna's striped version in the instructions.  And no pattern needed!

So I set to work.  I struggled to find the right fabric but went for the closest one and in doing so broke what has now become one of my cardinal rules of sewing - if you don't love the fabric, don't bother as you won't love the finished garment.

I worked out all the pattern  pieces from the very clear tutorial, and it went together really easily.  Except when I put it on, it was horrible.  I think the fabric was called Toothpaste stripe and it was as awful as that sounds.  And a kind of shiny canvassy twill.  I think I may have gone temporarily insane at the time of purchase!

The fabric was too stiff and I had made it too A-line.  I was also still losing weight at this point which probably didn't help with the look.  So I did what any self-respecting sewist would do in that situation - threw it in a corner and started on something better!

The next time i was in Fabricland I did spot the right material and nabbed it straight away.  It's a grey and white striped cotton.  I harvested the broad elastic from the waistband in the corner and whittled down the pattern pieces to fit my new smaller size and take out all of the A-line. 

Much better (scuse the horrible wrinkles - I didn't notice on the camera and it's far too cold now to get back outside and retake the pics!):


I really love stripes with florals and wore this outift a lot this summer.

It's a cheap as chips make - only 1m of fabric and you make your own pattern.  And speedy too - I think I might have taken 1.5 hours to sew up once I had the right sized pattern pieces. I think it could make a good winter skirt with tights and boots in a heavier fabric (although I would probably omit the pocket binding as I think that might become a bit bulky - perhaps a separate binding would work better on thicker fabric than the way this is applied)

And I had fun with the stripes on the pockets.  And matchy matchy waistband seams (the first time I have really managed this, but on a straight pattern piece there's no excuse not too!)


Monday 17 September 2012

Blogging the backlog: Hazel dress


I'm finally getting through blog posts on the things I made over the summer.  So I have quite a few coming over the next couple of weeks - it will look like I have been sewing up a storm (which if course I have!).

First up, the Hazel!  I did a bit of a preview on my weight loss post of this dress but thought it deserved a post of its own!
I actually really enjoyed sewing this pattern.  It went together really easily, even though I didn't get it done in time for the Sew Colette 2.0 sewalong. I bought the fabric for another pattern but I really like it for this.  I think it works well. 

First up was the usual length adjustment which I did with a tissue fit.  I had to add more than usual - about 3", as the pattern has a high waistling which I don't like.  I was slightly confused about how to do this given the triangular centre panel, but I extended it to a point and then adjusted the side panels in my muslin to take out the extra fabric as though it was a princess seam.  It doesn't match up exactly at the waist seam but the fabric is forgiving enough that I couldn't get a picture of it!

I actually made a muslin of the skirt for this one as I was a bit scared by Marie's nightmare with the skirt.  But it looked fine.  I added another 3" to the skirt length too.


And the two sides of the zip match up at the back!  I really like the Colette way of finishing off the facing at the top of zips - it gives such a great clean finish!

It's been a great addition to my summer wardrobe - if I had finished it earlier I think I would have made another one.  Still, there's always next year!

Wednesday 12 September 2012

It's a Kiely-fest!

I am a huge fan of Orla Kiely and her fab retro prints.  Unfortunately her usual stuff is way outside my budget!

Luckily for me, enter Uniqlo!


I had read it was sold out but thought I would try the Oxford St brand at lunchtime on the off chance.  they have just had a new drop and had a massive range of prints and sizes!

I love the dresses with the peter pan collars pictured above, but unfortunately they come up far too short on me with a belt.

But I picked up 2 lovely long sleeved boat neck tees:


And a lovely scarf which will brighten up last year's red winter coat:

A good haul and definitely lots of useful things that my wardrobe needs following my recent clear out (more on this to follow at some point!).

Tuesday 11 September 2012

Finshed Macaron!

Woohoo!  It's done.  My first sewalong, and although I finished last week, I haven't managed to get pics so I think I may be too late and missed the cut off.  But never mind - I do love it!


She had her first outing on Friday for a client meeting at work and the V&A with Karen and other sewing types and was I think well received (2 colleagues and some of the lovely sewists gave me some great comments!).

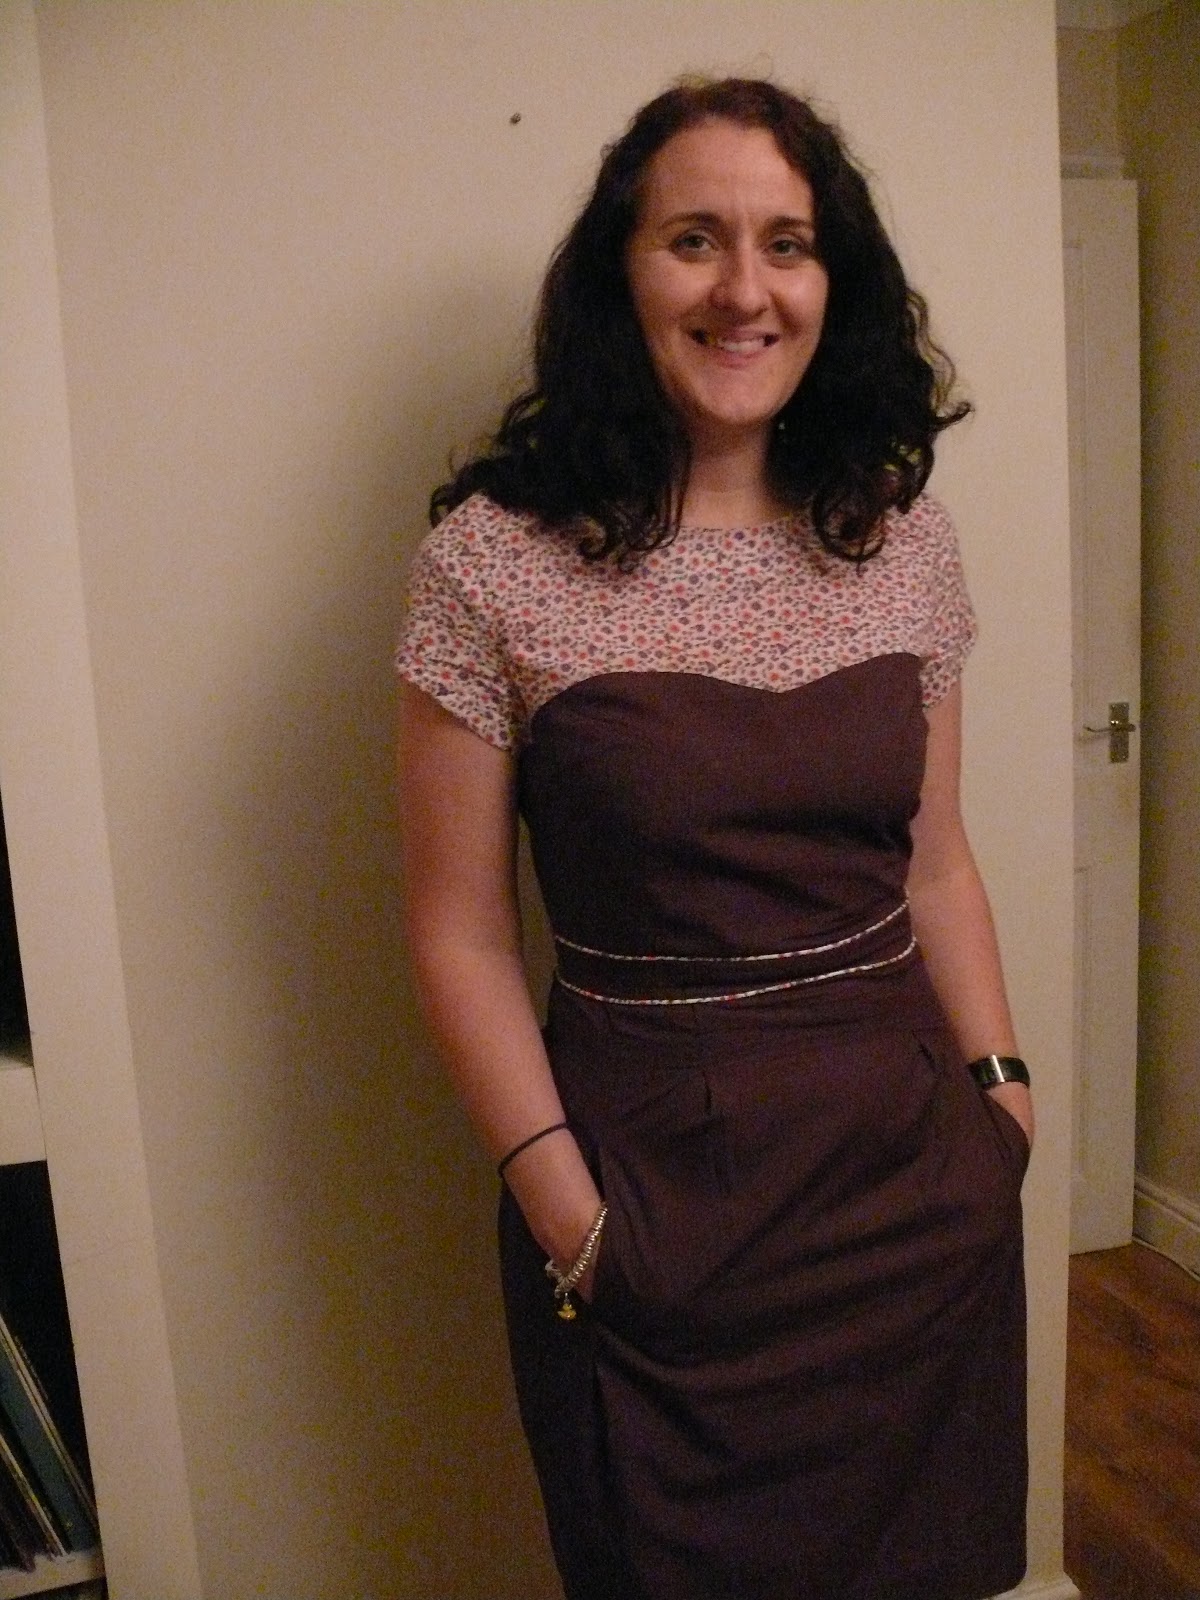
As previously blogged, I used a soft floral fabric (perhaps a voile?  I so need to improve my fabric knowledge!) for the yoke and a purple poplin for the shell, both in the sale at John Lewis.


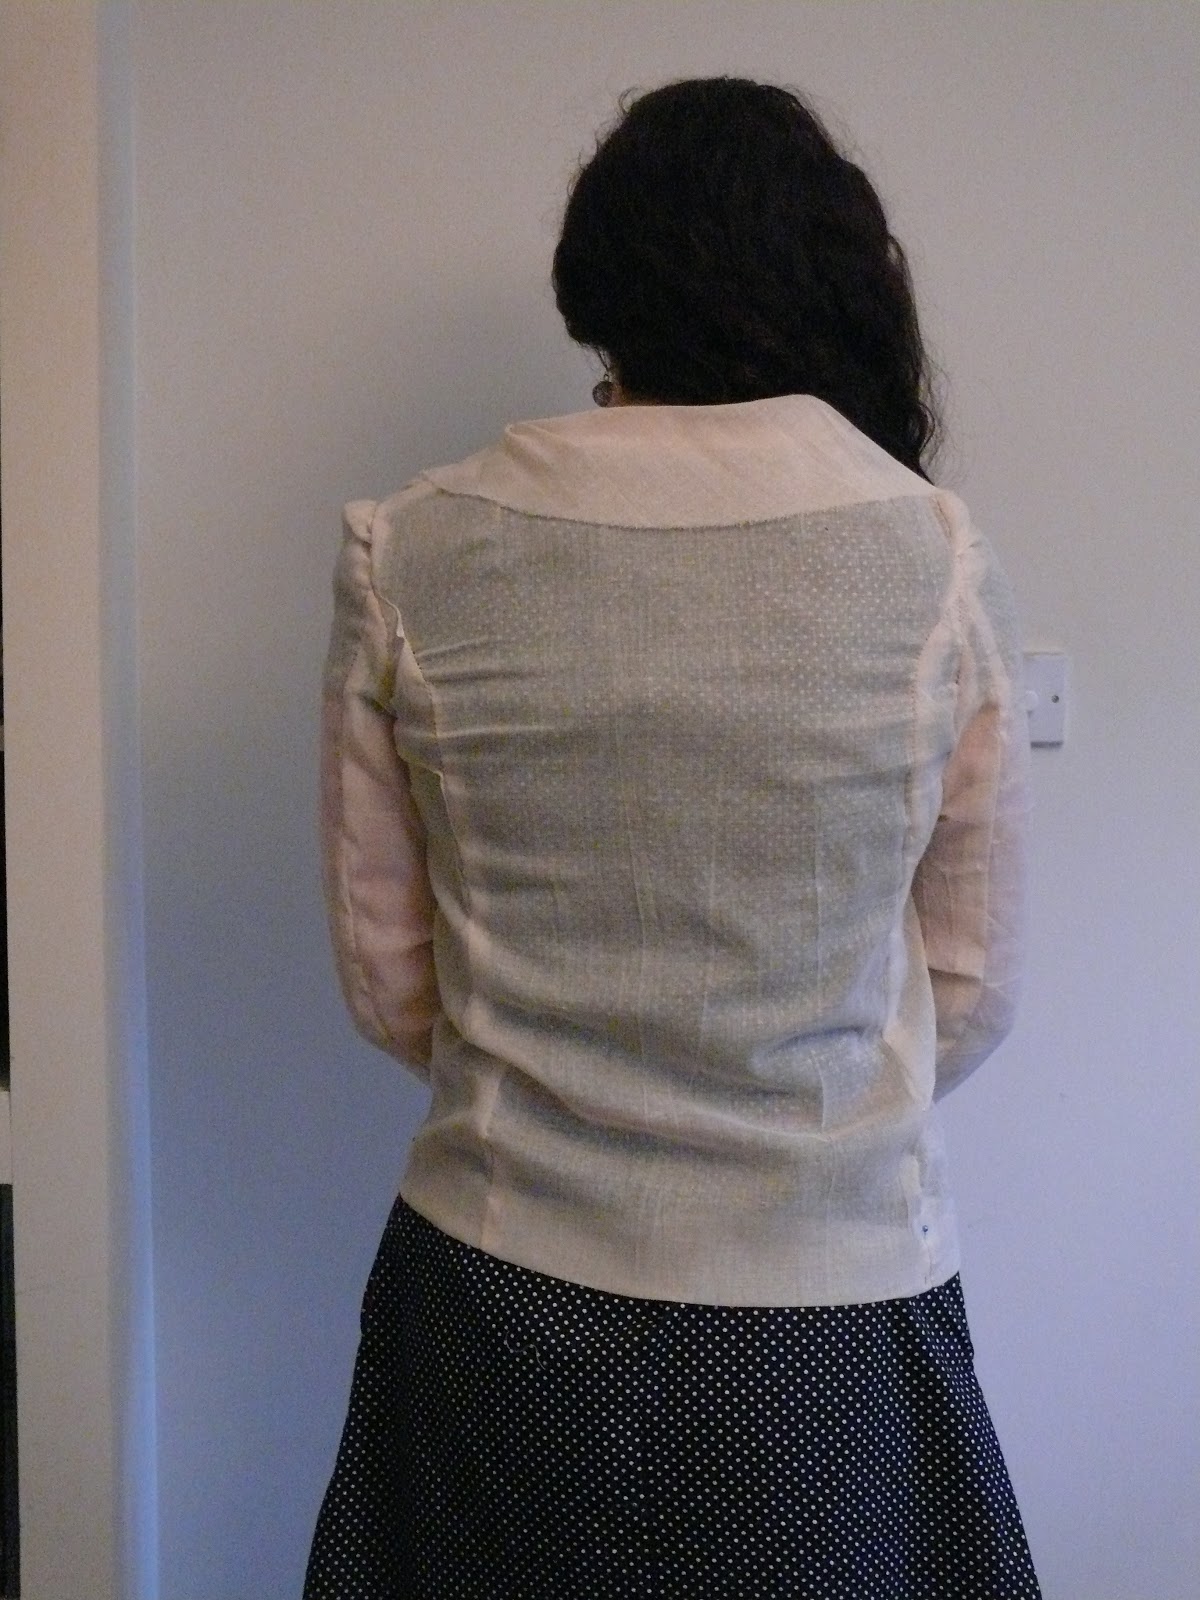
I cut a size 8 which fitted relatively well out of the packet, aside from my usual length adjustments.  I find Colette Patterns fairly short in the body so after tissue fitting I added 2" to the bodice length below the bust and 1" to the yoke.  The yoke adjustment meant adjusting the sleeve piece, which was surprisingly easy!  I spent hours trying to work out how to get the length I needed without adjusting the yoke as I was really scared of messing with the sleeve, but it was no problem.  I also on Rhinestones and Telephones' advice moved the bust dart down by about 1" as it was coming right at the top of the solid pattern piece and didn't look right.  I also lengthened the skirt by about 3".

The patterns calls for the midriff piece to be in the yoke fabric, but I thought mine was perhaps a bit too soft and drapey (maybe I am learning about fabric after all!).  I wanted something to break it up in the middle so decided on piping made from the floral fabric on either side of the midriff pieces.  This was something I had been thinking about for ages but never tried before and I was surprised at how easy it was.  I love the final look.  To insert it in one continuous piece, I changed the construction order slightly - I sewed the bodice front and back together at the side seam before adding the midriff piece and then added the piping, then the sewn together midriff pieces, then the rest of the piping.


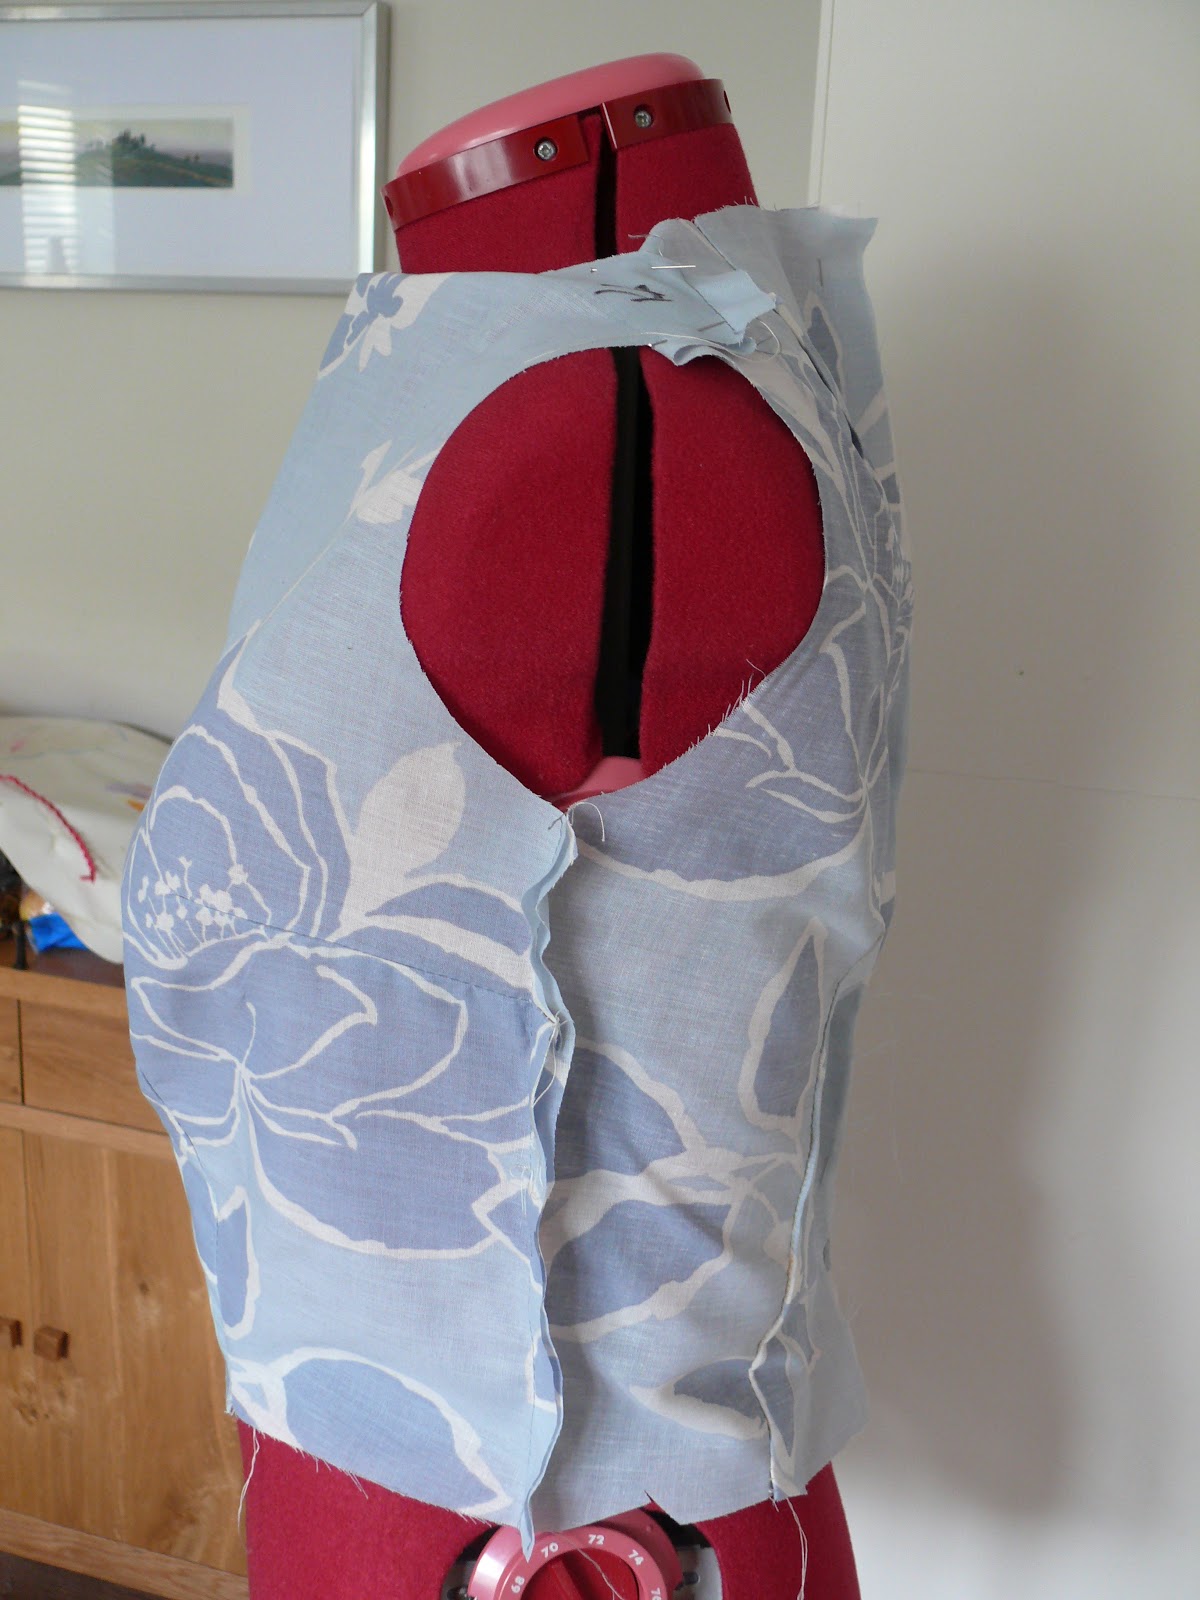
The bodice looked like the hardest part but I actually found the skirt to be more trouble!  The waist seemed very small (I have read in a few places since, notably the comments on Paunnet's blog that she and a few people had this problem) so I decreased the size of the pleats slightly.  I wish I had made a toile of the whole dress rather than just the bodice, but isn't hindsight great?

My invisible zip issues have been well documented previously, but in future I won't be using invisible zips wth piping at the waist.  Clearly not a good combination!  After failing with the invisible zip, I started again with a normal zip and got that in fine.  It does look a bit messy but I think I can live with it.  As suggested by the lovely Tania at the V&A trip, I could take it out and bind the edges to make it less messy, which I may well do. The equally lovely and scarily knowledgable Elaine also suggested some fusible interfacing on the edges works really well in that situation.

I also did lots of seam finishing on this make as I really wanted to make it as good as possible!

Clean finished seams:


I bound the waist seam with bias binding made from the floral fabric:


Catchstitched hem:


All in all I am really happy with the final dress.  Looking at all of the above, I learnt loads on this make including lots of fitting and finishing as well as a first attempt at piping (but I will be making a toile of the whole dress in future!).  I am getting better at my usual tall length adjustments and tissue fitting really helps to get these done before making a first toile which would never fit.


But why oh why did i persist in pointing out the zip problem to anyone who complimented me on the dress?  Grrr to me!  I need to learn just to say thank you!

Monday 10 September 2012

A lovely day!

I had a great day on Friday!

Following my pre-order months ago, I was thrilled to arrive at work and find that Amazon had come through with my copy of Gertie's book!

 
I have read it cover to cover and absolutely love it!  It is really inspiring, especially on the subject of tailoring. 

I had never realised all the stabilising and padding and reinforcing that goes in to creating a tailored garment.  But Gertie makes it all seem attainable even to a newbie like me!  I know it will be a long time before I can even think about attempting something like her suit jacket:


but i am sorely in need of tops and there are some gorgeous ones in the book that I can see in my near future!

The Portrait Blouse


The Keyhole Top


And I love the bound buttonholes on the back of the bow tie top:


And the Tiki dress is great!


In fact, maybe i should work through her book in the way she worked through VNBBS at the beginning of her blog!  I espcially love the fact that she models all the clothes.  She looks fantastic throughout!

And to top that off, I met up with Karen and a group of other lovely ladies to drool over the ballgowns at the V&A and talk sewing.  I completely forgot my camera so unfortunately don't have any pictures but it was lovely to talk about sewing and not see people sidling away - or maybe I just have that effect on people!  My particular favourite dresses were the black beaded bias cut dress (top pic, second from the left) and the Holly Fulton one with the Rocky Horror-esque lip print and leather trim (bottom pic on the catwalk).

Source:belleandbunty.co.uk
 
Source: idontwearfashion.blogspot.co.uk
Thanks to Karen for organising such a lovely night.